
DECTRIS D.LAB Uploader (beta)
DECTRIS D.LAB Uploader is a desktop application that guides you through uploading data to https://app.dectris.cloud.
It wraps the DECTRIS D.LAB SYNC engine in a graphical interface, so you can verify your credentials, select a destination experiment, and start uploading without touching a terminal.
The app supports two upload modes: Manual Upload (drag and drop files or folders on demand) and Auto Sync (watch a local folder and stream new files automatically).
1. Overview
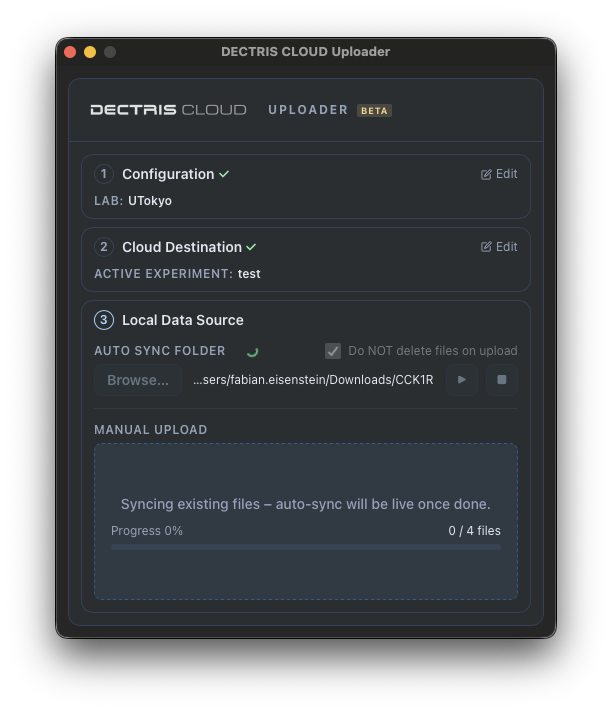
DECTRIS D.LAB Uploader runs as a small, fixed-size desktop window. It walks you through a three-step wizard on first use:
- Configuration: provide your license file and API key
- Cloud Destination: confirm the active experiment data will be uploaded into
- Local Data Source: choose Manual Upload (drag & drop) or start Auto Sync on a folder
Once the wizard is complete, the app connects to the DECTRIS D.LAB SYNC daemon running in the background. No terminal interaction is required at any point.
Key properties:
- Bundled sync engine: no separate installation of DECTRIS D.LAB SYNC is needed
- API key is stored in the OS credential vault (Keychain on macOS, Credential Manager on Windows), never in a plain-text file
- Works on macOS (Apple Silicon and Intel), Windows 10/11, and Ubuntu/Debian Linux
2. Download
Installation Required:
- For macOS (M1/M2/M3): click to DOWNLOAD.
- For macOS (Intel): click to DOWNLOAD.
- For Windows 10/11 : click to DOWNLOAD.
- For Ubuntu / Debian : click to DOWNLOAD.
- For RHEL / Fedora / CentOS : click to DOWNLOAD.
A valid DECTRIS D.LAB license file (.lic) is required. To request a license, contact support@dectris.cloud
3. Installation
3.1 macOS
- Open the downloaded .dmg file.
- Drag DECTRIS D.LAB Uploader into your Applications folder.
- Double-click the app to launch it.
Note: The application is currently unsigned. macOS may show "DECTRIS CLOUD Uploader is damaged and can't be opened." This is a Gatekeeper warning, not an actual problem with the file. To dismiss it, run the following command in Terminal once: xattr -cr "/Applications/DECTRIS CLOUD Uploader.app"
Then double-click the app normally. This step will no longer be needed once the app is notarized.
3.2 Windows
- Run the downloaded _setup.exe installer.
- Follow the on-screen prompts to complete installation.
- Launch DECTRIS D.LAB Uploader from the Start menu.
Note: Windows SmartScreen may display "Windows protected your PC." Click More info, then Run anyway. This warning appears for unsigned installers and will be resolved once an Authenticode certificate is in place.
3.3 Linux (Ubuntu / Debian)
Install the .deb package with:
sudo dpkg -i dectris-cloud-uploader_x.x.x_amd64.deb
Launch the app from your application menu or by running dectris-cloud-uploader in a terminal.
4. First Time Setup
The app guides you through a three-step wizard. Each step unlocks the next once completed.
4.1 Step 1: Configuration
You need to provide two credentials:
- License file
Click Browse… and select your .lic license file. This file is issued by DECTRIS and ties the upload session to your lab. - API key
Paste your DECTRIS D.LAB REST API key into the API key field. You can retrieve your current API key inside the DECTRIS CLOUD App, at https://app.dectris.cloud/sections/cockpit/laboratories > "Go To Cockpit" > "API Token" > "View API Token for Laboratory"
Click Validate to verify both credentials against the DECTRIS D.LAB API. On success, the step collapses and the app automatically advances to Step 2.
Note: The API key is stored in the OS credential vault immediately after successful validation. On subsequent launches, the app retrieves it automatically and attempts to re-validate silently, so you do not need to re-enter it.
4.2 Step 2: Cloud Destination
After validation, the app displays the experiment currently active for your lab:
- Project ID: the unique identifier from DECTRIS Cloud
- Title: the human-readable experiment name
- Principal Investigator: the PI associated with the experiment
If this is the correct target, click Validate to confirm and advance to Step 3.
If you need to switch the active experiment, click Switch Experiment? to open DECTRIS D.LAB Cockpit in your browser, change the active experiment there, then return and click Validate again.
4.3 Step 3: Local Data Source
Once the destination is confirmed, the app initializes the sync daemon in the background. This step provides two upload methods that can
be used independently.
5. Uploading Data
5.1 Auto Sync
Auto Sync watches a local folder continuously and uploads any new files that appear in it.
To start Auto Sync:
- Click Browse… next to Auto Sync Folder and select the folder to watch.
- Click ▶
- A dialog asks whether to also upload files already present in the folder.
Option 1: No, only new files: the daemon watches for changes going forward only.
Option 2: Yes, include existing files: the daemon first seeds all existing files, then continues watching. A progress bar is shown during
seeding. - Once active, a spinning indicator confirms that Auto Sync is running.
Click ■ to stop Auto Sync at any time.
Note: Auto Sync and Manual Upload share the same underlying sync daemon. Manual Upload (drag & drop) is disabled while Auto Sync is running. Stop Auto Sync first to resume manual uploads.
Note: Files are not deleted from the watched folder after upload. This setting is fixed and cannot be changed through the UI.
5.2 Manual Upload
The Manual Upload area is the dashed drop zone in the lower half of the panel.
To upload files or folders:
- Drag one or more files or folders from Finder / Explorer / your file manager and drop them onto the drop zone.
- The drop zone highlights in blue to confirm the drop is valid.
- After releasing, the queue count shows how many files are pending upload.
- The count decrements as files are transferred. An ✓ Upload complete confirmation appears briefly when the batch finishes.
There is no file-type restriction - the app uploads whatever is dropped.
6. Debug Logs
If you need to inspect what the sync daemon is doing, open the log file from the menu bar:
OS Menu Bar > Help > Open Debug Logs…
This opens dectris_uploader.log from your system's temporary directory in the default text viewer (Console on macOS, Notepad on Windows). The file is created automatically on first launch; it is safe to open even if no upload has occurred yet.
7. Troubleshooting
App shows "damaged and can't be opened" on macOS?
> Run xattr -cr "/Applications/DECTRIS CLOUD Uploader.app" in Terminal, then relaunch. See #31-macos.
Validation fails with "Unauthorized" or "Forbidden"?
> Double-check that the API key is copied in full with no leading or trailing spaces.
> Confirm the key has not been revoked in DECTRIS Cloud > "Go To Cockpit" > "API Token" > "View API Token for Laboratory"
Validation fails with "No active experiment found"?
> Your API key is valid, but no experiment is currently set as active for your lab.
> Open https://app.dectris.cloud/sections/cockpit/laboratories and activate an experiment, then retry.
Auto Sync starts but files are not appearing in DECTRIS Cloud?
> Check that the selected folder path is correct and accessible.
> If Yes, include existing files was chosen, wait for seeding to complete (the progress bar in the drop zone area shows status).
> Open Help > Open Debug Logs… and look for error lines from the sync daemon.
Drop zone shows "Preparing upload service…" indefinitely?
> The daemon binary may not have been found. This can happen if the app was moved after installation.
> Reinstall the app from the original installer.
> Check Help > Open Debug Logs… for binary not found or permission denied messages.
Files dropped but queue count stays at 0?
> Verify that Auto Sync is not running (stop it with ■ first).
> Try dropping a single small file to confirm connectivity.
8. Maintenance
To update: Download the new installer from here and install it over the existing version. Settings and the stored API key are preserved.
To uninstall:
- macOS: Drag the app from /Applications to Trash. To also remove the stored API key: open Keychain Access and delete the entry for dectris-cloud-uploader.
- Windows: Go to System Settings > Apps, find DECTRIS CLOUD Uploader, and click Uninstall.
- Linux:
sudo apt remove dectris-cloud-uploader
9. Support
If you encounter an issue not covered here, or would like to request a feature, reach out at support@dectris.cloud.